
In my never ending quest to brew better beer I finally went a built a wort chiller. For those of you who don't know the idea of a wort chiller is to cool the boiling wort as quickly as possible. There are several benefits to this such as: lowered risk of infection, better cold break, clearer beer. The are two basic designs for chillers immersion chillers or counterflow chillers.
I decided on a counterflow chiller becuase I feel they are a better design overall. My main complaint about immersion chillers is that if you use one you ent up with a batch of beer sitting out uncovered after it's been cooled to a point where it can be infected. With the counterflow chiller the beer is never exposed to air once it leaves your brewpot, and you can siphon it off while it's still at near boiling temperatures.
The downside to counterflow chillers is that they are harder to build and keep clean. But in the interest of helping other brew better beer I'm going to keep this page updated with my chiller experiences.
My design is based on a 5/8" garden hose, and 1/4" copper tubing. The copper is fed through the garden hose and fittings are built to allow water to run through the hose while beer runs through the copper.
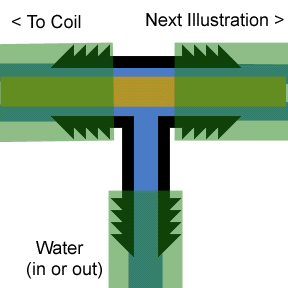
This first illustration shows how the two "T" fittings work. The idea is to let water flow around the copper tubing which is inside the garden hose. In these illustrations the garden hose is shown as green, plastic hoses are shown in varying shades of grey, and the copper is kinda copper colored.
The reason I only show one of the "T" fittings is because they are both constructed the same way. The only difference is which ever end you feed water into is the end you want to pull beer out of, and the end you let water drain out of is the end you want to push beer into. That's why it's called a "counterflow" chiller, but I know from accidental experience that it still works if you mess up and feed hot beer and cold water into the same end. The only problem with hooking things up backwards is the chiller isn't as effective or efficent.
For an explanation why water dosen't spray out around the copper tubing on the "non-coil" side, take a look at the next illustration. Also I don't show the hoseclamps that hold the garden hose on at each "T" junction.
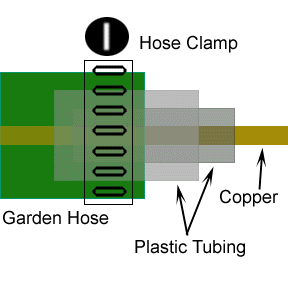
The hardest part is designing those fittings. What I ended up doing was buying rubber, and plastic hoses and hose clamps in decreasing sizes. In my original design I used 1/8" copper to allow more water two flow and it took three differently sized hoses to step it down. Unfortunatly 1/8" copper takes too long to siphon through and clogs too easily. So my current design uses two step down hoses.
As you can see in the illustration it's easier to show than describe. I made sure to have all three hoses (Garden, Plastic, Plastic) overlap where I put the hoseclamp. Because the garden hose is clamped to the "T" and to the hoses you end up using 8 hose clamps in all.
If you need help visualising this try imagining the "T" fitting illustration with it's right hand side lining up to the hose clamping illustration's left hand side.
Another nice thing about using garden hose to build a chiller is it's very easy to hook up a water source. On my chiller even though the coil is only 15-20 feet of hose and copper I kept the hose it's full 60 feet. This gives me plenty of extra hose at the ends of the coil to hook up to the sink and feed out the back door. And because I left the original ends intact there is no leakage at the sink connection! I use my chiller right on the kitchen table and don't have to worry about leaks.
In use this chiller is very simple. For sanitation I always siphon boiling water through the copper two or three times before using it. This is done without the cooling water since boiling water is hot enough to sanitize. I generally siphon 3-4 gallons of water which gives me about 15 minutes of contact. I'll also give a quick rinse with a very dilute bleach solution every third use. I've yet to see any degredation of the copper from the bleach and I've yet to have any contamination problems. Also, it's relativaly simple to replace the copper and cost effective since it only costs about $10 for the tubing.
Remember the chiller works best when it is allowed to "counterflow" so don't feed hot beer and cold water into the same end. The one thing that is important with a chiller like this is you MUST use a "hopback". Since I'm still working on a nice "Lauter Tun / Hopback" for my brewery I just use a strainer that's allowed to sit in the boiling wort for 15 minutes before it's done. Then I use that strainer to remove all hops and hot break. The only times I've skipped this step are the two times I've had to replace the copper coil, it will clog easily! The nice thing about this method is straining the wort aerates it nicely and it ferments very well. Once I have a full hopback I'll have to device a way to aerate after it leaves the chiller (Which is the better time to aereate anways!)
Back to brewing
Back to
hobbies page.